Anyone who administers Linux machines knows secure shell. Without this tool, administering those servers remotely would be quite challenging. It would also become harder to move files back and forth, at least with a modicum of security. That’s where secure copy comes into play. With the SCP command, you can copy files to and from a remote Linux server through an encrypted SSH tunnel.
SEE: How to View Your SSH Keys in Linux, macOS, and Windows
However, with the help of SSH key authentication, you can make that even more secure. I want to show you how you can use secure key authentication and SCP so you can rest assured your files are being moved back and forth securely. I will demonstrate on an Elementary OS client and Ubuntu 16.04.1 server and assume you have a secure shell installed and working.
1
NinjaOne
Employees per Company Size
Micro (0-49), Small (50-249), Medium (250-999), Large (1,000-4,999), Enterprise (5,000+)
Small (50-249 Employees), Medium (250-999 Employees), Large (1,000-4,999 Employees), Enterprise (5,000+ Employees)
Small, Medium, Large, Enterprise
Features
Monitoring, Patch Management
2
BDRSuite
Employees per Company Size
Micro (0-49), Small (50-249), Medium (250-999), Large (1,000-4,999), Enterprise (5,000+)
Medium (250-999 Employees)
Medium
Features
24/7 Customer Support, Data Redundancy, Encryption, and more
SSH keys
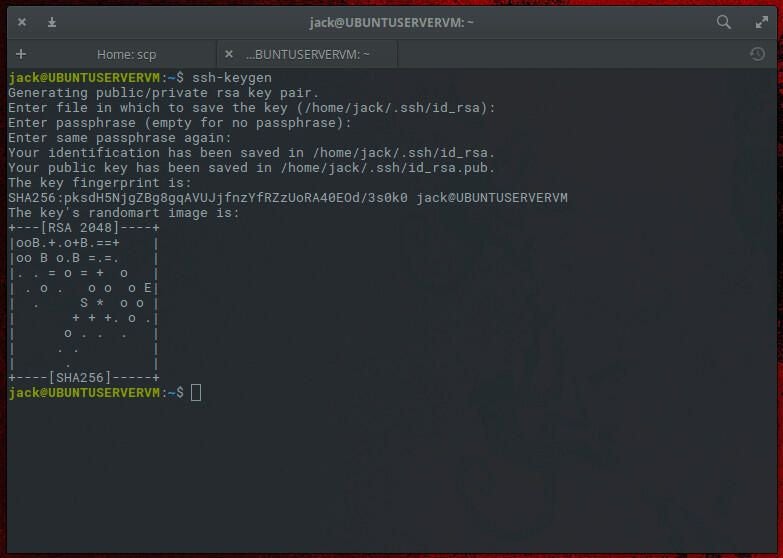
The first thing that must be done is to create an SSH key pair. To do this, open up a terminal window and issue the command:
ssh-keygen -t rsa
You will be asked to name the file (use the default) and give the keypair a passphrase.

Once the key’s randomart prints, your key is ready to go.
The next step is to copy the key to the remote server. This is done with the command:
ssh-copy-id USER@SERVER
Where USER is the username of the remote server, and SERVER is the address of the remote server.
You will be prompted for the remote user password. Once you successfully authenticate, the public key will be copied to the server. You’re ready to go.
SEE: Securing Linux policy (Tech Pro Research)
Using SCP with your key
Now that our keys are in all the right places, let’s see how we can use them through SCP. Assuming you accepted the default name for your SSH key upon creation, the command to send a file to your remote server using your SSH key is:
scp -i ~/.ssh/id_rsa.pub FILENAME USER@SERVER:/home/USER/FILENAME
Where FILENAME is the name of the file, USER is the username on the remote machine, and SERVER is the address of the remote server.
You should be prompted for the SSH key password (not the user password). Once authenticated, the file will be transferred.
The same holds true if you need to pull a file from the remote server. The structure of that command would be:
scp -i ~/.ssh/id_rsa.pub USER@SERVER:/home/USER/FILENAME /home/USER/FILENAME
Again, you will be asked for your SSH key password, and the file will be pulled from the server and copied to the local machine.
SEE: How to Add an SSH Fingerprint to Your known_hosts File in Linux
Forget that password
Let’s say you are about to undergo a long session of copying files to your server. Sure, you could tar them all up into one bigger file. But say they need to all be placed in different directories. That’s a lot of typing. You can make this slightly more efficient by using the ssh-agent and ssh-add commands.
That’s right, using the combination of SCP, SSH key authentication, and ssh-agent works well. This will keep you from having to type that SSH key password every time you issue the SCP command. The one caveat is that you must remember the PID of the agent session and kill it when you’re done.
Here’s what you have to do.
- Before issuing the SCP command issue eval
ssh-agentto start the session. - Make a note of the Process ID you are given when the session starts.
- Add your SSH key to the session with the command
ssh-add. - Start using SCP to copy your files.
That’s all there is to it. When you’re done with the session, ensure to issue the command kill PID (where PID is the actual number given to you when you started the ssh-agent session with eval).
SEE: 20 quick tips to make Linux networking easier (free PDF) (TechRepublic)
Is SCP still secure?
Someone asking if SCP is secure has likely read the 2019 release announcement for OpenSSH 8.0, which stated that the SCP protocol is “outdated, inflexible and not readily fixed” and recommended SFTP and Rsync as alternatives for file transfer.
Before OpenSSH 8.0, SCP could not verify file integrity during transfers, leaving users exposed to unauthorized overwrites and injection attacks if their server was compromised (CVE-2019-611). However, the update introduced stricter filename checking as the default for the SCP command, making it more secure, and moved its previous non-checking behavior to the command scp -T.
Then, in OpenSSH 9.0, released in 2022, SFTP was adopted as the default backend for SCP instead of the legacy SCP/RCP protocol, meaning that transfers are now encrypted and authenticated with the SSH protocol. While widely regarded as secure, users should still be wary of other risks like misconfigured servers or outdated software versions.
What can I use instead of SCP?
- SFTP: While SCP defaults to using the SFTP protocol, you can consider using native SFTP clients for advanced file management as it allows for more operations, such as viewing directories and file deletion.
- Rsync: Ideal for synchronizing files and directories, especially for incremental backups and large datasets. See TechRepublic’s guide on how to back up a network using Rsync.
- FTPS: A secure option for traditional FTP transfers with SSL/TLS encryption, but it can be complex to configure.
- HTTPS-based tools: Such as
curlorwget, for secure downloads over HTTPS. This is great for automation, but they don’t provide full directory management like SFTP.
Fiona Jackson updated this article in January 2025.


Leave a Comment